Hey everyone, it’s Drew, welcome to our recipe page. Today, I’m gonna show you how to make a special dish, cookie ice cream cake decorated for a birthday. It is one of my favorites. This time, I am going to make it a bit tasty. This is gonna smell and look delicious.
Cookie Ice Cream Cake Decorated For a Birthday is one of the most favored of current trending meals in the world. It’s easy, it’s fast, it tastes yummy. It is appreciated by millions every day. They’re nice and they look wonderful. Cookie Ice Cream Cake Decorated For a Birthday is something that I’ve loved my entire life.
Great recipe for Cookie Ice Cream Cake Decorated For a Birthday. My kids requested a birthday cake, so following their request, I finally came up with this type of cake. Since it's ice cream, it can be stored in the freezer for a good amount of time. It can be cut into individual slices so that.
To get started with this particular recipe, we have to prepare a few ingredients. You can cook cookie ice cream cake decorated for a birthday using 5 ingredients and 12 steps. Here is how you cook it.
The ingredients needed to make Cookie Ice Cream Cake Decorated For a Birthday:
- Get 1 basic raw dough, 1 batch Cookie Dough (Plain -
- Get 1 basic raw dough, 2 batches Cookie Dough (Cocoa -
- Make ready 1 i used 8 ice cream bars Store Bought Ice Cream (Your choice, can be mixed)
- Take 200 ml Whipped cream
- Prepare 2 tsp Caster (superfine) or granulated sugar
After crust has chilled, spread softened ice cream over fudge layer. Scoop remaining quart of ice cream into balls and arrange over spread ice cream layer. Two Days Before: Make a double batch of the cookies and cream ice cream base and chill. One Day Before: Make the Cake.
Steps to make Cookie Ice Cream Cake Decorated For a Birthday:
- Make the cookie dough. Arrange it to fit into the pan the you will be using. Wrap with plastic wrap, place on a tray, and put in the freezer.
- Bake the cookie dough and then let it cool. Layer the cookie and ice cream on a dish.
- Cover with plastic wrap, let it chill in the freezer until you are ready to decorate it.
- If you are leaving the shape as is, decorate with whipped cream, cookies, candles, etc., and it's finished.
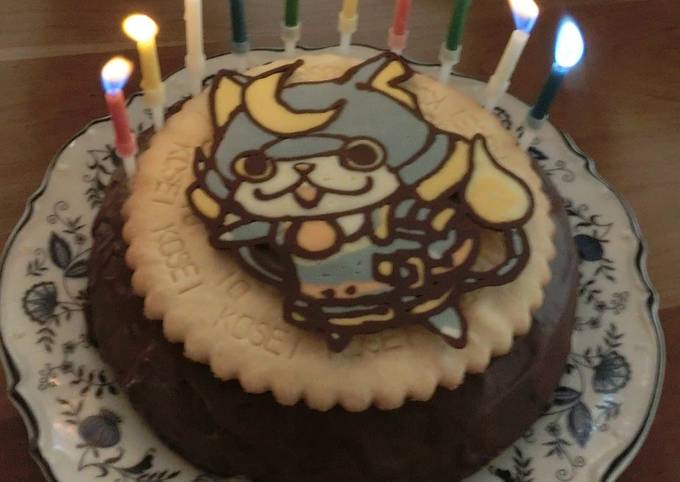
- (Finished Product #1) I placed a toy right in the middle.
- (Finished Product #2) After chilling a normal round cake, I coated it with crushed cookies and chocolate cream, and then placed it on a plate.
- (Finished Product #3) I combined two difference sized rings to form an '8.' I wrote the words with jam.
- (Finished Product #4) It's supposed to be a '9,' but it could also be a '6.'
- Here's what it looked like before I covered it with whip cream.
- (Finished Product #5) I covered the cake in whip cream and used store-bought snacks to build the spires and walls to make a castle! I let my kid draw the flags.
- Instead of using cookies in the center, I used store-bought castella cake. The ice cream is homemade. I used saskatoon berry sauce to make a marble pattern.
- After celebrating, cut the cake into individual slices and wrap them each up separately so that they will be easy to eat later.
Two Days Before: Make a double batch of the cookies and cream ice cream base and chill. One Day Before: Make the Cake. In a mixing bowl, whisk together the sugar, both flours, the cocoa, baking soda and salt. See more ideas about ice cream cookies, cookies, cookie decorating. DECORATE ICE CREAM CAKE: Before serving, spread a layer of whipped topping over the ice cream, pipe on rosettes if desired and arrange Oreo cookies in a circular design.
So that’s going to wrap it up with this exceptional food cookie ice cream cake decorated for a birthday recipe. Thanks so much for your time. I am confident you will make this at home. There’s gonna be more interesting food at home recipes coming up. Don’t forget to save this page in your browser, and share it to your loved ones, friends and colleague. Thanks again for reading. Go on get cooking!